As you can see, the program is very short. an explanation follows the code:
#include LiquidCrystal lcd(13, 12, 5, 4, 3, 0);
void setup() {
// set up the LCD's number of columns and rows:
lcd.begin(16, 2);
pinMode(0,INPUT);
pinMode(1,INPUT);
// Print a message to the LCD.
}
int sensor1Value, sensor2Value;
void loop() {
if(digitalRead(1)){sensor1Value = analogRead(A0);} // read the switch, overwrite stored LDR value
if(digitalRead(2)){sensor2Value = analogRead(A0);} // read the switch, overwrite stored LDR value
lcd.setCursor(0, 0); // set the cursor to first line
lcd.print("s1: ");
lcd.print((int) (sensor1Value*(10000.00/1023.00)), DEC);
lcd.setCursor(0, 1); // set the cursor to next line
lcd.print("s2: ");
lcd.print((int) (sensor2Value*(10000.00/1023.00)), DEC);
delay(100); // the delay slows down the refresh of the display (lcd.clear in the loop) to improve readability.
}
First of all, we need to include the LiquidCrystal library to give us access to the functions some other altruistic geek has written for us. Immediately following that - and outside of main() and loop(), so that it is in the global scope (it can be accessed from anywhere) - the instance of lcd is initialised with the output pins used on the Arduino, so we don't need to set them later. If you look at the numbers here, you'll see they correspond to the digital pins connected to on the Arduino board. There's no magic in which numbers to use - they're just like that to show that you can use whichever pins you want and that control lies within the sketch.
In setup we call begin on lcd which defines the number of columns and rows in the display. Next we tell the Arduino that we'll be using pins 1 & 2 for input - these are the push-switches. Remember that the lcd library set the outputs for the display so we don't need to.
Again in the global scope, so that they don't get redefined by every iteration of loop(), we declare the variables sensor1Value and sensor2Value.
Now onto loop() - the centre of operations:
if(digitalRead(1)){sensor1Value = analogRead(A0);}
this instruction says, "If the switch on pin 1 is pressed, overwrite the value in sensor1Value with the new value read from analogue input 0 (A0) by function analogRead(). The following line does the same for the switch on pin 2.
The remainder of the sketch is concerned with writing the information to the display.
First we need to clear the display to avoid interference from previously written data. Then we construct the string to write for each line of the display. s1: and s2: correspond to the switches. The calculation converts the digital value into something vaguely meaningful. The Arduino can measure an analogue input in 1024 steps. I was playing with the pull-down value on the LDR, so I divided that by 1024 to give a value to each step. I don't remember what the meaning was, though. Anyway, we multiply that by the measured input and print it to the display. Finally, I added a delay because I was getting some flicker.
Please try this out and let me know how you get on! If you're feeling nerdy you could even buy a shirt or hoody from RedBubble and make me a little money.
9 Jan 2011

3 Jan 2011
Arduino Light Meter
Well, this is the layout for the lightmeter as it stands. I created the image using Fritzing which is a great application for virtual breadboarding. It'll also produce circuit diagrams and printed circuit boards (PCB) from your layout, although it's early days and the results can be a bit interesting.
If I've made any mistakes in the wiring, I'm sorry. Let me know and I'll correct it. And don't hold me responsible if you maim or kill yourself (or anything else) - I'm not offering this as instructions or a tutorial.
That said, the voltages and currents here are pretty small (5volts or less) and even if you wire it wrong, you're unlikely to damage anything. Do be careful, though, of polarities i.e. positive (+ve / 3.3v / 5v ) and ground (GND or 0v).
The circuit has three main parts and they are grouped as such on the breadboard (the big white thing at the bottom).

If I've made any mistakes in the wiring, I'm sorry. Let me know and I'll correct it. And don't hold me responsible if you maim or kill yourself (or anything else) - I'm not offering this as instructions or a tutorial.
That said, the voltages and currents here are pretty small (5volts or less) and even if you wire it wrong, you're unlikely to damage anything. Do be careful, though, of polarities i.e. positive (+ve / 3.3v / 5v ) and ground (GND or 0v).
The circuit has three main parts and they are grouped as such on the breadboard (the big white thing at the bottom).
- At the left are two switches that are tied to GND through the resistors and feed into digital 1 & 2. Press one of these switches and it will read the value of the LDR and store it in one of two variables. This will let me use the same LDR to measure dark areas and light areas.
- The central section is the LDR. Again it is tied to GND through a resistor and this time feeds into analogue 0.
- The right hand section includes the LCD (the green thing above the big white thing) appears to be the most complex, but it's just a lot of wiring. The little bit on the breadboard is a preset (or trimmer) variable resistor used to adjust the contrast of the display. There is also a resistor there which serves to drop the voltage to a safer 2v for the LED illumination that the LCD uses. More about that later.
If you're wondering what the blue thing is, that's the Arduino. It even says so. It's virtually identical in colour and layout to my real Uno.
Now, some explanation about a couple of things:
There is an explanation of breadboarding here, but basically, the two tracks at the top and bottom are linked horizontally and are normally used for power (and ground) rails. The central section has tracks that are linked vertically and this is where we build the circuits.
I've wired the LCD into a hotchpotch of inputs. It doesn't really matter which you use so long as they are reflected in the code, which we'll look at later.
Where I've tied something to GND through a resistor, that is because if there is no definite state on an input, the Arduino can't make up its mind how to read it and the result can be erratic. 'Pulling it down' to ground gives it a definite default off state. You can also 'Pull up' to a voltage, say the 5v rail, in which case it would have a definite default on state. Think of it like a door. With a closer spring, the door will be closed unless it is held open. Without the spring it will be however it was left: open, closed or part-open.
That's all for now. Next time I'll look at the code, explain how it works and think about improvements.
Getting to Grips with the Arduino
There are plenty of Arduino tutorials out there - try the Arduino website, LadyAda and, of course, Google. I don't plan to add to them.
The ubiquitous "Hello, World!" application is a blinking LED. Typically it blinks the onboard LED. If you're really daring you can plug in an external LED and make that blink. Right. As I said before, my kit (should have) shipped with 60 LEDs. I can't get excited about making LEDs flash whether it's one or sixty, yellow, red or blue. If I want a flashing LED, I'll buy one - it's way cheaper.
A lot of the tutorials build on the flashing/fading LED for several chapters. Unless you are obsessed with them or need simple concepts repeatedly driven home, I'd suggest you skip these chapters and start doing real stuff.
Fortunately for me, the LEDs and resistors had been omitted from my kit, so I was left with the handful of components I had kicking around - one LED, some switches, three resistors of mixed value, a servo, some variable resistors and a couple of LDRs (light dependent resistors). Oh, and an LCD display I ordered with the kit (about £3.00). Time to get creative!
I said I wanted to make an enlarger timer and controller for photography. A really useful add-on to that would be an exposure meter that I could use to measure the darkness of the darks and the lightness of the lights to calculate the contrast as well as the exposure.
I've built the first bit and it only took about an hour! To achieve this I combined three tutorials from the Arduino website and hacked the sketch (the Arduino world's word for a program) a little. The tutorials are:
Finally, liquid crystal displays (LCDs) are commonly used in calculators etc. They're more complex than switches and variable resitors so here we introduce the concept of libraries. A library is a bunch of code and functions that someone has written to deal with a specific situation - in this case LCDs. By including the library at the beginning of our sketch, we gain access to all those extra functions.
That's enough for now. Next time I'm going to include the circuit I came up with and the sketch.
The ubiquitous "Hello, World!" application is a blinking LED. Typically it blinks the onboard LED. If you're really daring you can plug in an external LED and make that blink. Right. As I said before, my kit (should have) shipped with 60 LEDs. I can't get excited about making LEDs flash whether it's one or sixty, yellow, red or blue. If I want a flashing LED, I'll buy one - it's way cheaper.
A lot of the tutorials build on the flashing/fading LED for several chapters. Unless you are obsessed with them or need simple concepts repeatedly driven home, I'd suggest you skip these chapters and start doing real stuff.
Fortunately for me, the LEDs and resistors had been omitted from my kit, so I was left with the handful of components I had kicking around - one LED, some switches, three resistors of mixed value, a servo, some variable resistors and a couple of LDRs (light dependent resistors). Oh, and an LCD display I ordered with the kit (about £3.00). Time to get creative!
I said I wanted to make an enlarger timer and controller for photography. A really useful add-on to that would be an exposure meter that I could use to measure the darkness of the darks and the lightness of the lights to calculate the contrast as well as the exposure.
I've built the first bit and it only took about an hour! To achieve this I combined three tutorials from the Arduino website and hacked the sketch (the Arduino world's word for a program) a little. The tutorials are:
- AnalogReadSerial - reads the value of an analog (non-digital) input, in my case the LDR.
- Button - reads the state of a digital input. Possibilities are ON or OFF.
- LiquidCrystal - uses library code to interface to an LCD display.
A light dependent resistor (LDR) normally has a high resistance. As light shines on them, the resistance drops by a known amount. Measuring the drop tells us the relative light intensity. There're some nice pictures here.
It's easier to understand the concept of analogue inputs if you first understand digital! As you probably know, computers work with ones and zeros. One equates to on or true, zero equates to off or false. That doesn't give us a lot to work with. It's okay for a switch, so we configure that as a digital input, but the LDR (which you can also think of, for these purposes, as a variable resistor or potentiomer) has a whole range of 'on' values. We need to take the value and convert it to a digital value. The Arduino cleverly does this for us using a built-in A/D (analogue-to-digital) converter. It represents the value as a number between 0 and 1023. If you have a 10k potentiometer, it'll measure in steps of about ten ohms.
Finally, liquid crystal displays (LCDs) are commonly used in calculators etc. They're more complex than switches and variable resitors so here we introduce the concept of libraries. A library is a bunch of code and functions that someone has written to deal with a specific situation - in this case LCDs. By including the library at the beginning of our sketch, we gain access to all those extra functions.
That's enough for now. Next time I'm going to include the circuit I came up with and the sketch.
28 Dec 2010
Arduino T-Shirt
Nerdy, geeky. I made an Arduino t-shirt design. You can buy it as a tee a hoodie a vest or a sticker on RedBubble. I don't know why, but white ones are cheaper.


26 Dec 2010
Arduino!
I bought my self an Arduino for Christmas. Why? Wtf is an Arduino?
Very simply put, an Arduino is a small, programmable computer on a tiny circuit board with built in interfaces. Yeah. What do you do with it? Well, probably almost anything you can think of. Common uses are in robotics and control. Some applications I have in mind are:
Very simply put, an Arduino is a small, programmable computer on a tiny circuit board with built in interfaces. Yeah. What do you do with it? Well, probably almost anything you can think of. Common uses are in robotics and control. Some applications I have in mind are:
- temperature and humidity control for my egg incubator
- enlarger timer and controller for film photography
- flight management system for a tri-rotor helicopter
Okay, it's really nerdy. But it's also electronics for programmers. The Arduino is programmed using C. That might seem scary, but if you've ever programmed javascript, java or PHP, you'll feel pretty comfortable.
Arduino themselves describe it as "...an open-source electronics prototyping platform based on flexible, easy-to-use hardware and software. It's intended for artists, designers, hobbyists, and anyone interested in creating interactive objects or environments."

You have the ability to easily interface sensors (data input) and analog or digital outputs, e.g. motors and LCD displays. Expanding this, I can use temperature and humidity sensors to turn the incubator heater on and off. Light sensors to measure a film exposure and display the result on an LCD display or gyro, and GPS to autonomously control a model helicopter.
The variety of sensors available is huge and there are ready made software libraries to do almost anything you can think of.
So it must be expensive. Not at all. My starter kit cost about £33 and included a genuine Arduino Uno (more about genuine in a moment), 60 LEDs and a pile of other components. I bought it from Earthshine Electronics but there are dozens of other companies with their own deals.
Arduino is an open-source project and that extends to the hardware as well, so you can get Seeduino, Freeduino (not free!) etc. clone boards. In general, they're all 100% compatible. You can even build your own. The boards on their own mostly cost from £10 - £30.
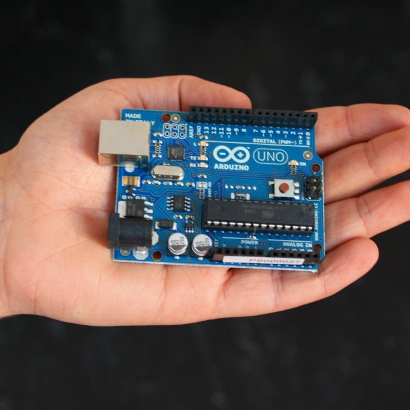
You have the ability to easily interface sensors (data input) and analog or digital outputs, e.g. motors and LCD displays. Expanding this, I can use temperature and humidity sensors to turn the incubator heater on and off. Light sensors to measure a film exposure and display the result on an LCD display or gyro, and GPS to autonomously control a model helicopter.
The variety of sensors available is huge and there are ready made software libraries to do almost anything you can think of.
So it must be expensive. Not at all. My starter kit cost about £33 and included a genuine Arduino Uno (more about genuine in a moment), 60 LEDs and a pile of other components. I bought it from Earthshine Electronics but there are dozens of other companies with their own deals.
Arduino is an open-source project and that extends to the hardware as well, so you can get Seeduino, Freeduino (not free!) etc. clone boards. In general, they're all 100% compatible. You can even build your own. The boards on their own mostly cost from £10 - £30.
22 Dec 2010
Git links
Trying to find the answer to this question, "Git bare - what to backup?" threw up some useful links:
How to manage a website with Git
The Git object model
How Git stores objects
How to manage a website with Git
The Git object model
How Git stores objects
3 Dec 2010
Helping clients understand web designers
I have a friend who is about to become a client. He asked me to recommend a book that will teach him enough about web design, without actually ramming the how-to down his throat, to be able to know what can be done and how to communicate his needs and ideas.
Now normally it would be the job of the designer to tease this information from the client without him having to be exposed to the jargon. This chap, though, genuinely wants to know and to understand and I don't have a problem with that. I think it'll make him a better client.
Actually finding a book to recommend is not easy. So far all I have come up with is Web Design All-in-one For Dummies which I think will probably cover stuff he needs to know, but again it's probably too technical.
Any other suggestions?
Now normally it would be the job of the designer to tease this information from the client without him having to be exposed to the jargon. This chap, though, genuinely wants to know and to understand and I don't have a problem with that. I think it'll make him a better client.
Actually finding a book to recommend is not easy. So far all I have come up with is Web Design All-in-one For Dummies
which I think will probably cover stuff he needs to know, but again it's probably too technical.Any other suggestions?
1 Dec 2010
fruit
Testing the link between Flickr and Blogger.
If you want to link your Flickr and Blogger accounts watch this video: http://www.flickr.com/photos/ivanwalsh/3504011106/
You can choose whether you share a photo - it doesn't automatically share everything.

If you want to link your Flickr and Blogger accounts watch this video: http://www.flickr.com/photos/ivanwalsh/3504011106/
You can choose whether you share a photo - it doesn't automatically share everything.
<pre> and <code> in blogger blogs
It seems that the best way to post code in a blogger blog is by encoding the chevrons '<>' and ampersands '&' using something like http://centricle.com/tools/html-entities/
Some styles are needed in the template and you have to wrap the code up in <pre>...</pre> or <code>...</code>
Some styles are needed in the template and you have to wrap the code up in <pre>...</pre> or <code>...</code>
The Coldfusion Blog Tutorial
There may well be one out there, but I didn't look too hard.
Today, snowbound at home, I am adapting the CakePHP blog tutorial to Coldfusion. The only difficulties will be that cakePHP & MVC makes a lot of things very easy, but doing it in CF is going to be very 'hands on'. At least I'll get a lot of low-down experience with CF.
If it proves to be interesting or useful and if I have the time or the inclination, I may well publish it for the benefit of other CF newcomers.
Today, snowbound at home, I am adapting the CakePHP blog tutorial to Coldfusion. The only difficulties will be that cakePHP & MVC makes a lot of things very easy, but doing it in CF is going to be very 'hands on'. At least I'll get a lot of low-down experience with CF.
If it proves to be interesting or useful and if I have the time or the inclination, I may well publish it for the benefit of other CF newcomers.
30 Nov 2010
Mac OSX VPN to Windows 7
Forced home by snow and impending more snow I had to set up VPN access from my Hac to my Windows 7 workstation. Fortunately the VPN server end is already set up.
Doing the Mac setup was pretty trivial. Go to network settings in system preferences. Add a new connection using the + sign at the bottom left. Then just follow through the settings. It's really not that difficult. If you're a bit dim, there's a picture guide here: http://bit.ly/do_vpn_on_mac
Of course, you also need some sort of remote desktop app. The first one I found was CoRD (http://cord.sourceforge.net/) which seemed a bit tricky to set up, and says it doesn't use Mac VPN, but it doesn't work without a VPN connection. Anyway, it's pretty slick and FREE. The second one was Microsoft Remote Desktop Connection for Mac 2, which is included with every edition of Office for Mac 2011 (if you're fool enough to buy it or use it). Well, it's also a FREE download (http://www.microsoft.com/mac/remote-desktop-client) and, surprisingly, it works.
They both work well but, politics aside, I don't know which one I'll use. I've only had half a day to try them out.
Doing the Mac setup was pretty trivial. Go to network settings in system preferences. Add a new connection using the + sign at the bottom left. Then just follow through the settings. It's really not that difficult. If you're a bit dim, there's a picture guide here: http://bit.ly/do_vpn_on_mac
Of course, you also need some sort of remote desktop app. The first one I found was CoRD (http://cord.sourceforge.net/) which seemed a bit tricky to set up, and says it doesn't use Mac VPN, but it doesn't work without a VPN connection. Anyway, it's pretty slick and FREE. The second one was Microsoft Remote Desktop Connection for Mac 2, which is included with every edition of Office for Mac 2011 (if you're fool enough to buy it or use it). Well, it's also a FREE download (http://www.microsoft.com/mac/remote-desktop-client) and, surprisingly, it works.
They both work well but, politics aside, I don't know which one I'll use. I've only had half a day to try them out.
Coldfusion
It's been a while since I wrote anything, but that doesn't mean I haven't done anything. I've been head down wrapping up a CakePHP CMS before I changed jobs. Now I'm a Coldfusion developer. WTF? I've never used it but working through the tutorials it seems really straightforward. I guess the hard part will be letting go of MVC. Of course, someone has cooked up an MVC framework for CF, but there's too much legacy in my new job to even think about it.
I'll still be doing the CakePHP stuff as well as I have one or two personal projects and, for a smalltimer, hosting Coldfusion is just too expensive.
I'll still be doing the CakePHP stuff as well as I have one or two personal projects and, for a smalltimer, hosting Coldfusion is just too expensive.
30 Jul 2010
Basic .htaccess Modifications
This is a useful .htaccess for a basic CakePhp website. It enables
compression, normalises URLs by removing 'www' and then moves on to the
standard CakePhp redirection:
compression, normalises URLs by removing 'www' and then moves on to the
standard CakePhp redirection:
# compress all text & html:
AddOutputFilterByType DEFLATE text/html text/plain text/xml text/css
text/javascript
<IfModule mod_rewrite.c>
RewriteEngine on
# Convert all http://www.example.com style URLs to http://example.com
RewriteCond %{HTTP_HOST} ^www\.(.+)$
RewriteRule ^(.*)$ http://%1/$1 [R=301,L]
RewriteRule    ^$ app/webroot/    [L]
RewriteRule    (.*) app/webroot/$1 [L]
</IfModule>
In certain situations - in this case our CMS - this substitution might
be useful:
#RewriteRule    ^$ app/webroot/    [L]
RewriteRule    ^$ my-anchor-page    [L]
29 Jul 2010
INSERT rows with SELECT & mixed data
To extract values from one table, to update another where you also need
to supplement the data - in this case
(`module_type_id`,`module_id`,`zone_id`,`position`) are static
(12,42,12,1) - include the supplementary values in the SELECT statement:
to supplement the data - in this case
(`module_type_id`,`module_id`,`zone_id`,`position`) are static
(12,42,12,1) - include the supplementary values in the SELECT statement:
INSERT page_items
(`node_descriptor_id`,`module_type_id`,`module_id`,`zone_id`,`position`)
SELECT id ,12,42,12,1 FROM node_descriptors
22 Jul 2010
20 Jul 2010
CakePHP offline manual
There used to be an offline manual - I don't remember whether it was official - but there no longer seem to be any direct links. A little digging around revealed some answers which I thought it would be useful to share.
These are links to the manual in one page - useful for creating a PDF using Dardo Sordi Bogado's build script: http://rapidshare.com/files/218826372/manual-builder.zip. It is also very useful for searching quickly using ctrl-f in your browser.
- 1.2 Manual in one page http://book.cakephp.org/complete/3/The-Manual
- 1.3 Manual in one page http://book.cakephp.org/complete/876/The-Manual
Also see this thread: http://groups.google.com/group/cake-php/browse_thread/thread/5f45c1d0
17 Jun 2010
template woes
Yeah, okay, the template is a bit raw, but not as bad as the old one. When I get some time I'll neaten things up a bit.
8 Jun 2010
6 May 2010
Getting CakePHP up and running on Ubuntu
To enable mod rewrite, you need to add a symbolic link to the module definition file, which lives in /etc/apache2/mods-available, to the folder: /etc/apache2/mods-enabled. Do this by first changing to the mods-enabled folder then adding the symlink.
In the sites-enabled folder /etc/apache2/sites-enabled, edit 000-default (this is actually a symbolic link to etc/apache2/sites-available/default, which will need to be made editable before making changes). You will need to add the statement:
to the directory blocks for '/' and '/var/www'. If these blocks do not contain the statement:
then add it at the end. Make sure that any occurrence of AllowOverride None within these blocks is changed, commented or deleted.
cd /etc/apache2/mods-enabled
ln -s ../mods-available/rewrite.load
AllowOverride All
Allow from all
3 May 2010
Dual booting Hac & Ubuntu 10.04 LTS
After a night and a day of swearing, it turns out that the key to getting this dual boot working is to install Grub2 in a location other than the default option. I selected the Linux install partition. Now all I have to do is figure out why Xiezhy (the Hac bootloader) thinks Ubuntu is Windows.
And this new Ubuntu is fucking quick!
And this new Ubuntu is fucking quick!
Subscribe to:
Posts (Atom)